Tucks and crease lines were a bit tricky to do but can be created through the pen tool:
- Choose a low stroke such as 0.25 and click FROM a point for tucks a most creases. For the next anchor point, place in the direction you would like it to go but use the handles to create a small curve at the end where it tucks.
- Stitching lines have been created at 0.5 stroke and dashes of 1pt with a gap of 2.
- For side views you really have to indicate every detail for example the split in the hem, a slight hint is shown to add interest and to make it look more professional.
- Shadowing has been created with the live paint bucket by selecting the area and fill. This helps to show the contrast in the right and wrong side of the fabric.
SKIRT!
- The asymmetrical nature meant that it couldn't be reflected.
- The zip wraps around the side, back and front of the garment.
- There is some crunching of fabric at the back accentuated by fine pen lines.
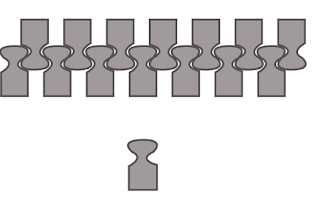
- Find zip image and trace ONE tooth.
- Fill with any colour or leave blank. Reflect it horizontally and place side by side so the teeth fit inside each other.
- Place a rectangle from the centre point of the first tooth to the centre point of the last one with no stroke or fill.
- Send this to the back and drag everything into the brushes pallet.
- Select patterned brush and name.
- Use the pen tool to create a line then click on this specific brush and a line will appear with your brush.


No comments:
Post a Comment